
BUBBLE QUILT TUTORIAL
Michelle’s Method

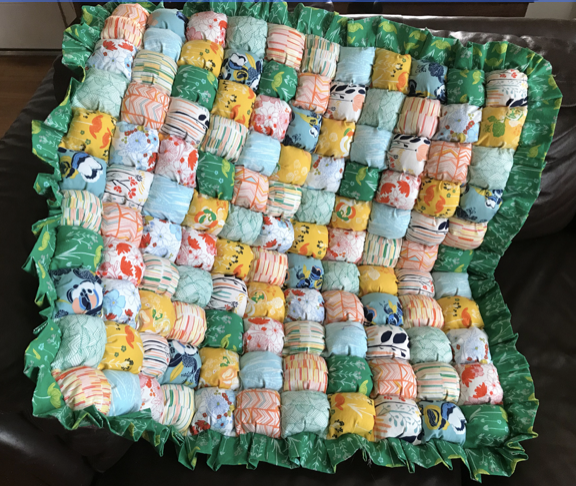
Bubble Quilts (also called Biscuit Quilts) are super fun to make, and are perfect for tummy time play mats, cushions, or pet beds.
They tend to be on the heavy side, the bigger they get, so they are not recommended to use as blankets for infants. They are intended for laying on and playing on, and sitting on.
There is another puffy quilt style, called a “Puff Quilt”, which is thinner and lighter and makes a wonderful cozy blanket. For this tutorial, we will learn how to make a BUBBLE/BISCUIT quilt. I think you will enjoy the process!
CUTTING SQUARES

Cut your top squares 5”, and your bottom squares 4”. The puffs will finish at just under 3” square.
NOTE: You can make your puffs smaller or larger, just be sure to cut your bottom squares 1 inch smaller. For this tutorial, we will make ours 5”.
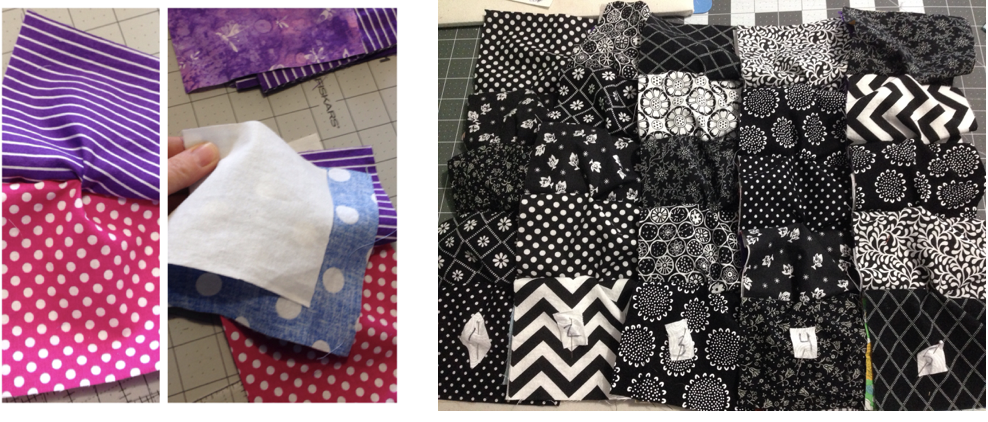
PREPPING YOUR BACKING SQUARES

Cut diagonal slits in the middle of your backing squares, about 2” long.
Note that the backing squares will not be seen in the finished quilt, and so you can use up your ugly fabric for these, or cut up an old (but clean!) sheet.
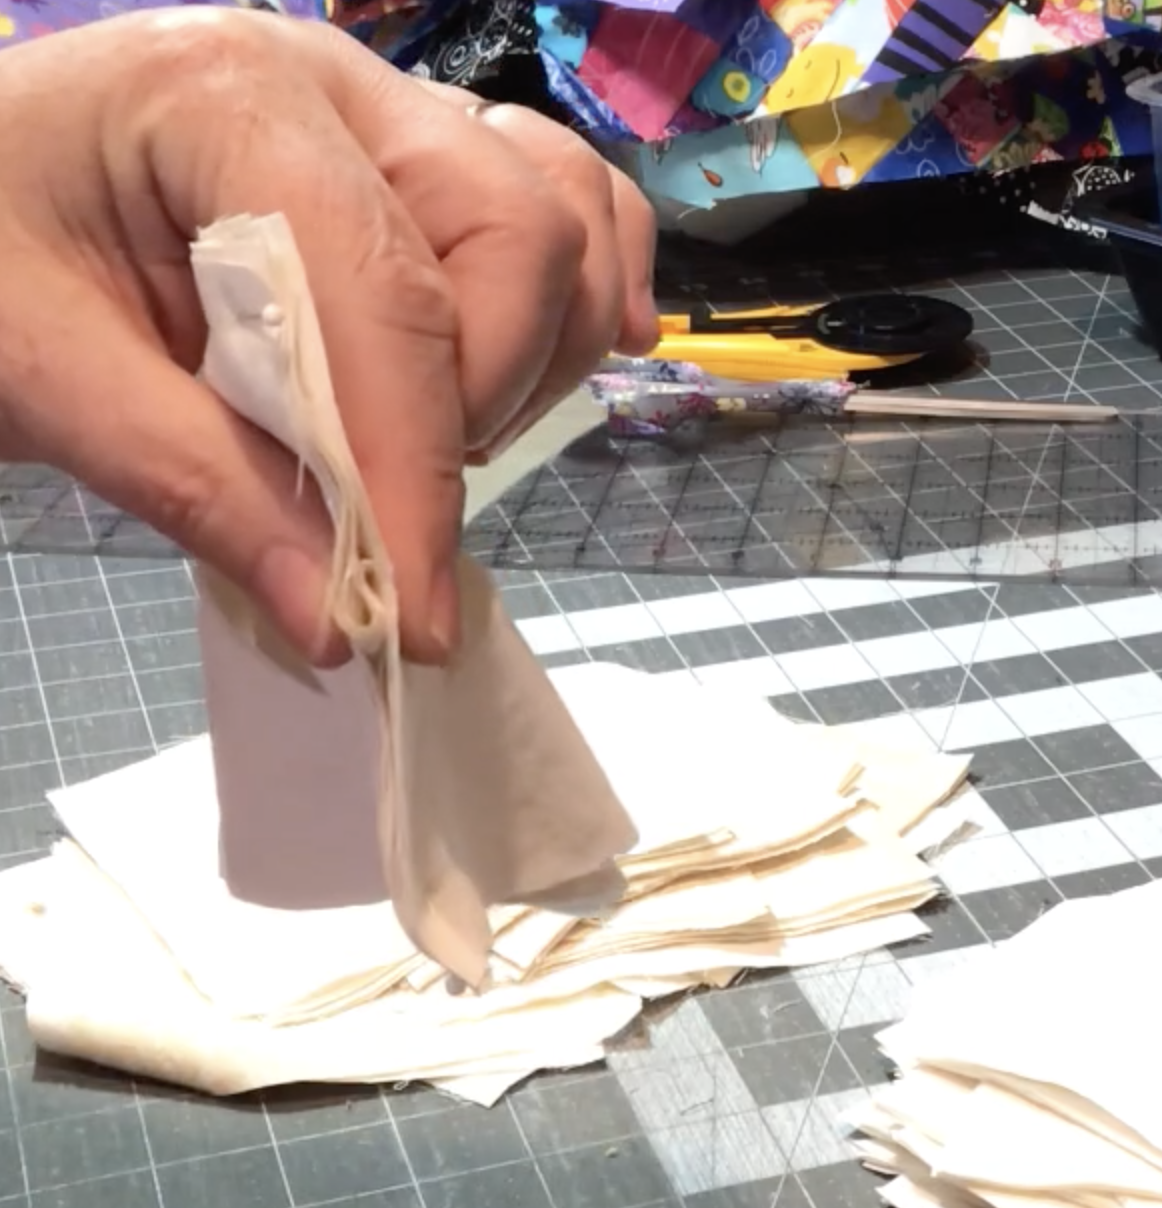
PINNING YOUR SQUARES, or “MAKING BISCUIT SANDWICHES”

Make a “biscuit sandwich” by pinning squares together in the following order:
1 backing square, 1 top square, 1 top square, 1 backing square. Your top squares should be in the center, pretty sides facing each other, and the backing squares should be on the outside. It does not matter which direction your diagonal slit is going. They don’t all have to be facing the same direction. Use your fingers to make an S-curve from the two top squares, then squish flat and pin in approximately the center of your square sandwich.
VIDEO DEMONSTRATION OF PINNING BISCUIT SANDWICHES
PIN BISCUIT SANDWICHES INTO ROWS
Continue adding more biscuit sandwiches, until you have your row pinned together.
Label your rows so you don’t lose track of what order you wanted them in. Be sure to put your label on the same end of each row. I usually label the bottom of each row. I like to just pin a bit of scrap, with the row number written on it, to the first square in each row. If you are doing a random mix, or if you are using just one fabric and don’t care what order they are in, you can skip the labeling step.
SEW YOUR SANDWICHES INTO ROWS
Sew all of your pinned seams, backstitching at the beginning and end of each seam.
(no photo of this step yet)
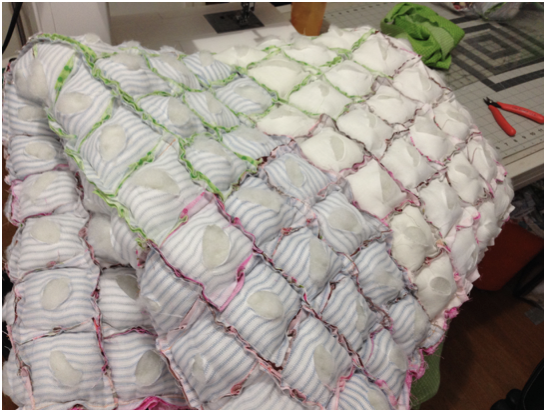
PIN ROWS TOGETHER

Pin two rows together in the same manner as when you pinned your sandwiches. Pin the corners and intersections first, then do the tuck in the middle. I usually sew my rows together in pairs, then sew the pairs together, and so on, until the top is all sewn.
ADD (OPTIONAL) RUFFLE (if you are not adding a ruffle, skip to “tacking down your edges”)
Measure all sides of your finished top. Add all measurements together and multiply by 2. This is usually plenty long enough for a good ruffly ruffle, usually with some left over.
For example, if my finished quilt is 33 inches x 33 inches, I will add 33 + 33 + 33 + 33 = 132 inches. Double that, and I will need my ruffle strip to be a total of 264 inches long.
That’s the length. For the width, I usually make mine 6 inches wide, just because that’s how wide my quilting ruler is so it’s super easy to cut the strip. If you have a cutting mat and a rotary cutter, it goes very quickly. Fold your fabric in half, and maybe in half again if needed, and then cut your 6-inch wide strips. How many strips will you need? Well, how wide is your fabric? About 42 (useful) inches, right?
Ok so we need a total of 264 inches for our sample quilt ruffle, and so 264/42=6.3. I always round it up, so I want to cut 7 strips that are about 42” long and sew them together end-to-end.
How much yardage should I get? There are 36 inches in a yard, so I can get 6 strips out of one yard. For my example quilt, I would need 1 yard and 6 inches, or 1 1/6 yards total.
There are a lot of ways to make a ruffle out there. The gathering technique is fine for shorter lengths, but if you are making a quilt, your ruffle is going to be really really long and that method might be a bit of a headache.
I prefer to make the ruffle as I go, while I’m sewing it on. Fold your strip in half, and leaving about 8” or so on the end, pin it somewhere around the middle of one side of your quilt, with the fold facing inwards.
No, you don’t need to iron your strip in half, but you can if you want. That’s just extra work that I don’t want to do lol. I’ve done a bazillion of these now though, so I’ve gotten pretty good at keeping it folded and lined up while I sew. You should do what works best for you.
Now, start sewing your ruffle on. Sew a few stitches, then add a tuck and sew over the tuck until your foot goes over it. Make another tuck, sew over it, and so on. Doing it this way, keeps your tucks evenly spaced. My tucks are about an inch apart. If you want your ruffle more ruffly, make bigger tucks, or more frequent tucks. Just make sure you are consistent the whole way around.

For the corners, pin extra tucks, at least 3-5, around the curve, so that when you open your quilt, the ruffle fans out nicely.

When you get close to where you began sewing on your ruffle, stop about 8 inches from where you started, and trim your ruffle, so that you have two 8-inch lengths OVERLAPPING each other. Match up the ends of your ruffle and pin them together (right sides facing each other), and sew the ends together.

Now, pin some tucks into the remaining ruffle (sorry I don’t have a pic of this step yet), pin it to the quilt so they are evenly spaced, and finish sewing the ruffle onto the quilt. Hold it up so you can see! Looking good!

TACKING DOWN YOUR EDGES (if you added a ruffle, you can skip this step)
If you did NOT add a ruffle to your quilt or cushion, then it is recommended you do this step, just as added reinforcement. Pin the corners of your quilt top, and pin the tucks in the middle in each puff, all around all four edges of your quilt or cushion.
Stitch all the way around the quilt, using about a 3/8” seam allowance, and about a 2.0 stitch length. (no photo of this step yet)
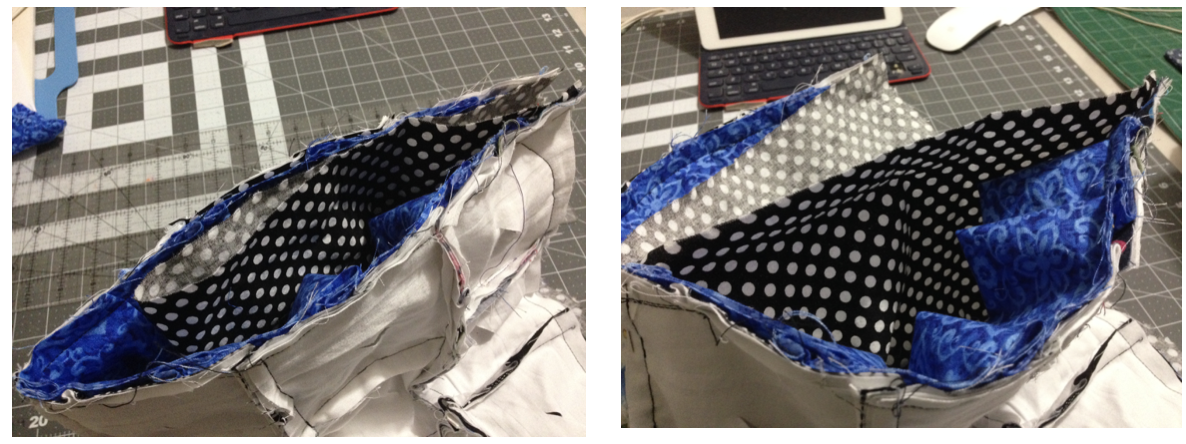
ADDING THE BACKING FABRIC
Here’s the tricky part, because right now, your quilt top is a LOT larger than you want your finished quilt to be, right? Well, remember when I said that the finished puffs are about 3” square? The top of your quilt will shrink down a lot once everything is stuffed.
So, you want to cut your backing piece to reflect what size your FINISHED quilt will be. I do add a few inches just so it’s not too tight. On my example quilt of 33” x 33”, I would my cut my backing piece about 36”x36”.
Lay your beautiful finished quilt top on a table, or on the clean floor, facing up. Put your backing piece over the top, facing down so that right sides are together.
When pinning the backing on, will need to space out the pins evenly like so:
Pin the corners together first. In fact, you might want to use a safety pin on the corners, so it stays together while you are doing the next step.
Find the center by folding your quilt and backing piece in half as shown, and match the center of your backing piece to the center of your quilt top. Pin the centers together. Now do this again, to put a pin halfway between THOSE pins. Repeat doing this so that your quilt top is spaced nice and even along your backing piece.
Do this to all four sides of your quilt/backing.
Beware of the ruffle as you are pinning, always making sure the ruffle is tucked inside before adding any pins.
LEAVE AN OPENING FOR TURNING
Now that all four sides are pinned and evenly spaced, remove a pin or two on one side, so that you have a section that is from 8-12” inches or so, that will be your hole for turning it all out when you are finished stuffing.
(no photo yet)
SEWING YOUR BACKING ON
Start at the first pin next to where your opening will be, and you will want the BACK of your quilt sandwich facing up, so you can see your previous stitching line(s. Set your stitch length to 2.0 or 1.8. Using the other seam lines as a guide, just be sure to sew your final seam to the INSIDE of those seams. Remember to leave a section open for turning.
(no photo yet)
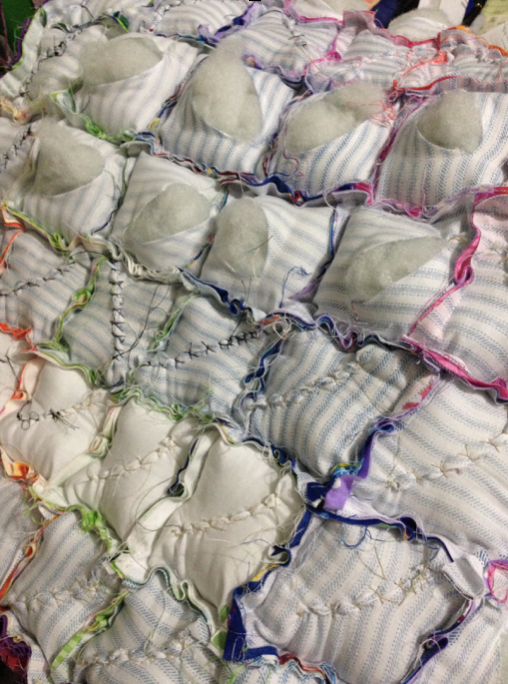
STUFFING YOUR PUFFS
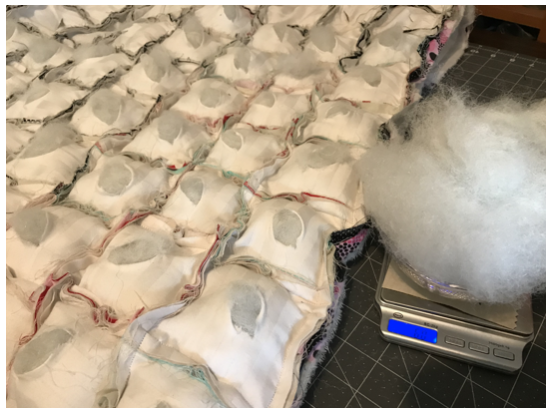
If you have a kitchen or postage scale that can measure in grams, use it, you will thank me later! It will save you lots of time, and your puffs will all be uniformly stuffed. If you do not have a scale, you can eyeball it, making your fluff balls about the size of your fist, maybe a little bigger. Whatever you decide to use as a measurement, just do them all the same way.
I usually add 5-6g of fluff into each puff for a quilt, and 7-8g for a cushion. You can add more or less, whatever you like best. I stick a small plastic bowl on top of my scale and zero it out with the bowl on, and then start measuring out my fluff. The bowl helps keep the fluff contained.
When my quilt starts getting near the end of stuffing, it gets pretty bulky, so I’ll fold it in half, and sometimes half again, to fit it on my table.
CLOSING UP YOUR PUFFS
Now you can whip-stitch your slits closed. You don’t have to be pretty, and you don’t have to worry about matching thread, you can use up your ugly thread, or the one color you have the most of. I double my thread to give it extra strength.
Tie a knot at the beginning and end of each slit to secure. Don’t cut your thread after finishing sewing a slit closed, just tie a knot, and move on to the next closest slit, tie at knot at the beginning, stitch the slit closed, and tie a knot and move on to the next one until you’ve run out of thread. Start a new thread, and continue this method until all slits are stitched closed.
NOTE: leave a bit of slack in between each puff, so the threads don’t get pulled and possibly broken, when the quilt is moved around during use.
TURN YOUR QUILT RIGHT-SIDE OUT and FINISH
Almost done! Now you want to carefully start turning your quilt right-side-out, through that large opening you left on one side. Take your time, squishing your quilt through the hole a small bit at a time. Once it’s totally turned out, stick a finger inside each corner and push out the corners. Now flip your quilt over, top side facing up and have a look! Isn’t it beautiful?? Great job! Now all you have to do is close up that last hole in the side and you’re done! Have someone hold it up for you, or lay it across a chair or couch and admire your beautiful work! Someone is going to be very very happy to receive your beautiful creation!
Use a ladder stitch to close up that final hole. I like to add a few pins to hold it in place and space the puffs out evenly, and then do my ladder stitch.
(No photo of this step yet)
If you make a quilt or cushion using my tutorial, I would love to see photos of your finished projects! You can leave your comments and photos on the original blog post here.
Thank you, and enjoy! If you would like a short video demonstration or more photos of any of the above steps, just let me know! To leave a comment, go to the blog post and leave your comment or question.
Michelle Savoy
creator at Happy Squishies